
Virtual and Augmented Reality together are now referred to as XR or “Extended-Reality”.
You’re in the right place at the right time to build something amazing in XR!
XR applications can be created in Unity for many devices, our focus will be on Microsoft Hololens 2 and the Meta Quest 2 / Pro.
In this specific blog post series we will focus on Hololens 2 in the latest Unity and Visual Studio!
Want to see the other blog articles in this (and other) series?
Click here to see all of my XR Step-by-Step blogs separated by device and version!
Welcome! I love the Hololens!! It can solve real-world problems by bringing computational vision to industries that have never had anything as immersive as this before…
We need to get more developers working and comfortable with the tools — so together we’ll be doing just that. Buckle up, and welcome to the future of XR!
Now that we have our tools installed and configured (see XR Step-by-Step 2023! Hololens 2: Installing the Tools you need! Unity 2022 + MRTK 2.8.3 + Visual Studio 2022) we’ll setup our project!
Pretty easy with a road-map on what you need to do (which I aim to provide to you!) but non-trivial by far without a good set of instructions. Especially if you want to use the latest versions of all our awesome tools!
TL;DR -> Quick Reference summary FOLLOWED BY the detailed Step-by-Step with images!
- !!! NOTE: Below this Quick Reference is the fully detailed Step-by-Step version with images !!!
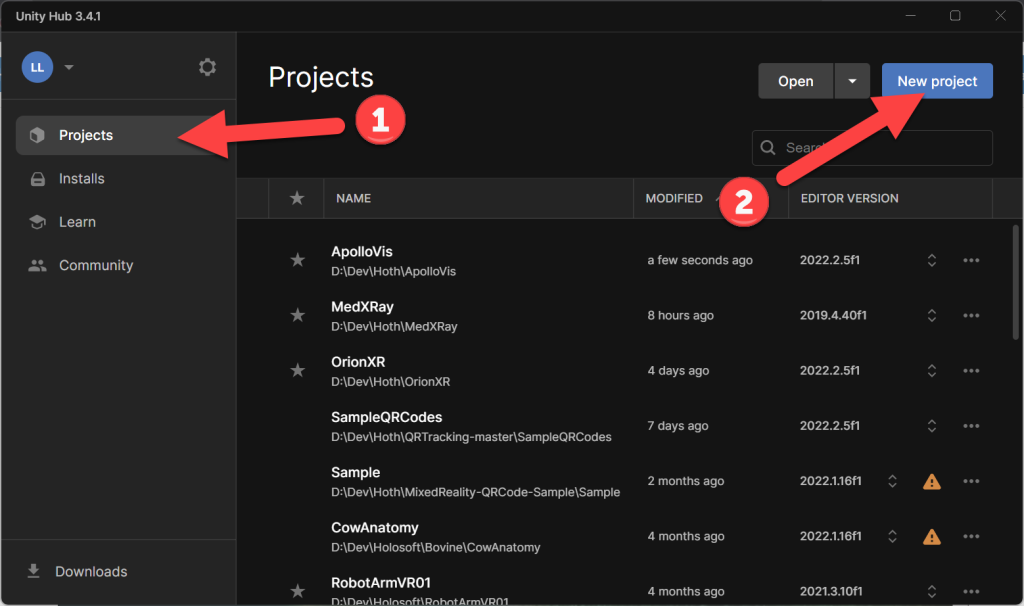
- (Unity Hub) Click Projects -> click New Project
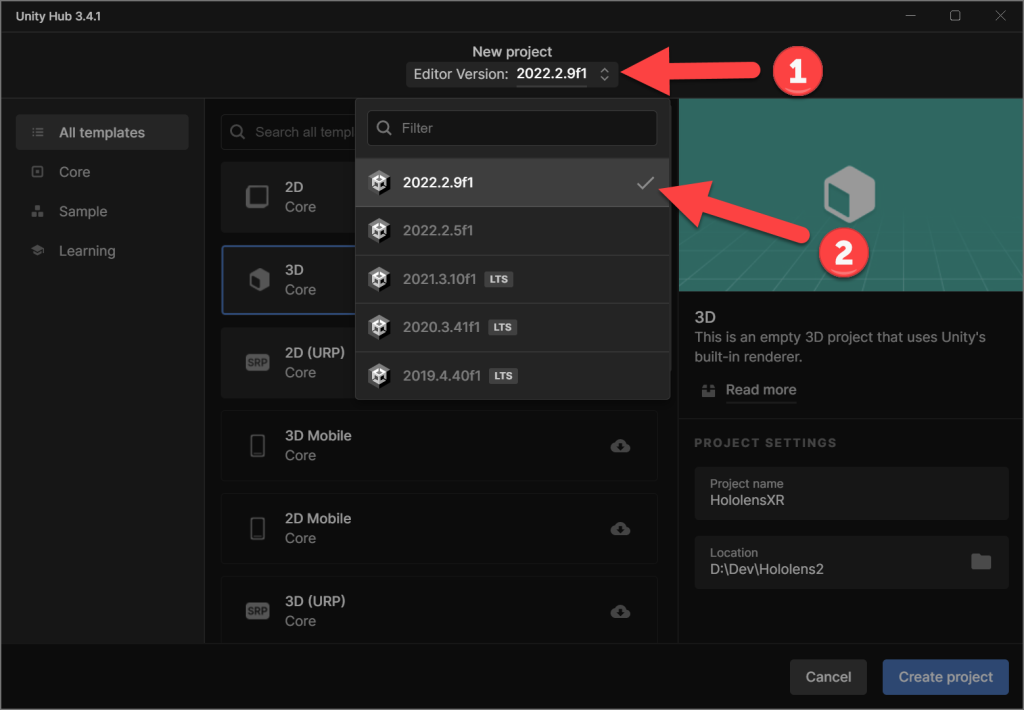
- (Unity Hub) Click Editor Version -> Click the newest Unity version
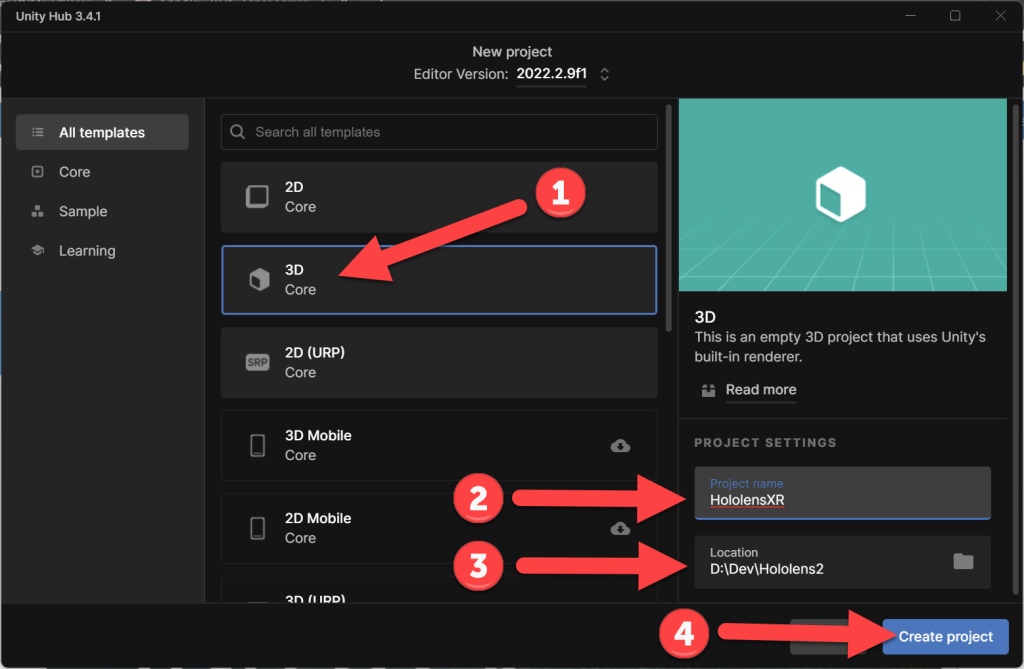
- (Unity Hub) Click 3D template -> Set Project Name -> Choose Location -> Click Create Project
- (Unity Toolbar) File -> Build Settings…
- Click Add Open Scenes
- Switch Platform to Universal Windows Platform
- Switch Architecture -> ARM 64-bit
- Switch Minimum Platform Version -> 10.0.18362.0 (or newer)
- Check Copy References
- Click Switch Platform
- (Mixed Reality Feature Tool) Expand Platform Support -> Add Mixed Reality OpenXR Plugin to project
- (Unity Toolbar) Edit -> Project Settings
- Click XR Plug-in Management
- Click Universal Windows Platform settings tab
- Check OpenXR
- Check Microsoft HoloLens feature group
- Click the Warning Icon -> Click Fix All
- Click Windows, Mac, Linux XR Plug-in Management Settings tab
- Check OpenXR
- Check Microsoft HoloLens feature group
- Click the Warning Icon -> Click Fix All
- If left with “At least one interaction profile must be added.” -> Click on Edit
- (Project Settings -> OpenXR) Click the “+” under Interaction Profiles
- Add Eye Gaze Interaction Profile
- Add Microsoft Hand Interaction Profile
- (Project Settings -> OpenXR) Click the “+” under Interaction Profiles
- (Unity Toolbar) Mixed Reality -> Project -> Apply recommended project settings for HoloLens 2
- (Unity) Click Project tab -> Select Assets -> Drag other MRTK Unity Packages (one at a time) into the Assets section -> Click Import after each
- [Required] Microsoft.MixedReality.Toolkit.Unity.Foundation.2.8.3.unitypackage
- (MRTK Project Configurator) Click Apply Settings -> Click Import TMP Essentials
- [Recommended] Microsoft.MixedReality.Toolkit.Unity.Tools.2.8.3.unitypackage
- [Recommended] Microsoft.MixedReality.Toolkit.Unity.Examples.2.8.3.unitypackage
- [Recommended] Microsoft.MixedReality.Toolkit.Unity.Extensions.2.8.3.unitypackage
- [Optional] Microsoft.MixedReality.Toolkit.Unity.TestUtilities.2.8.3.unitypackage
- [Required] Microsoft.MixedReality.Toolkit.Unity.Foundation.2.8.3.unitypackage
- (Unity Hierarchy) Select your scene
- (Unity Toolbar) Mixed Reality -> Toolkit -> Add to Scene and Configure…
- (Unity Hierarchy) Expand MixedRealityPlayspace -> Click Main Camera
- (Inspector) Camera -> Change Background to Solid Color -> Set to black if needed
- [Optional] Add a cube or something to your scene for verification that your project works as expected 🙂
- (Unity Toolbar) File -> Build Settings… -> Build
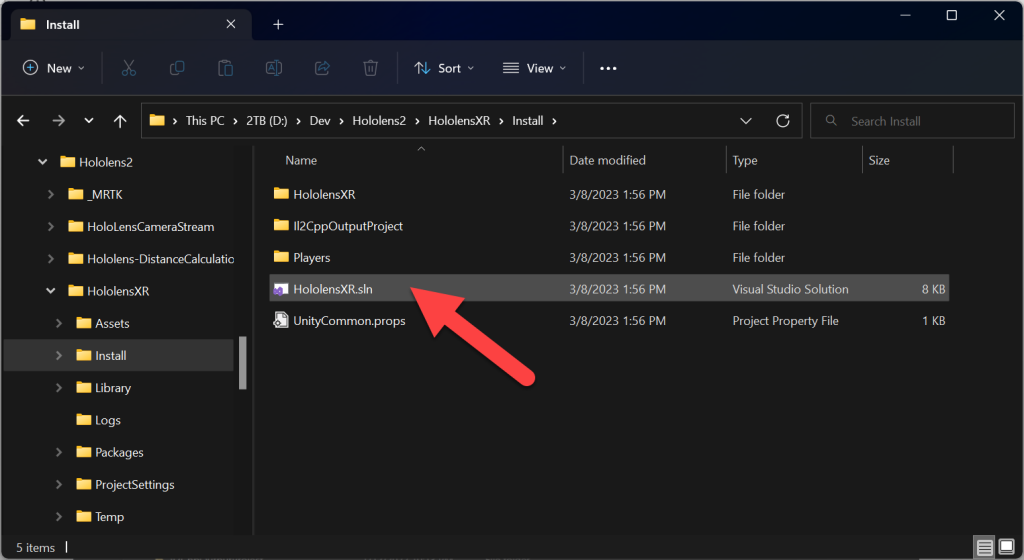
- (Windows Explorer) Click on the *.sln file in your Install folder (if you named it that)
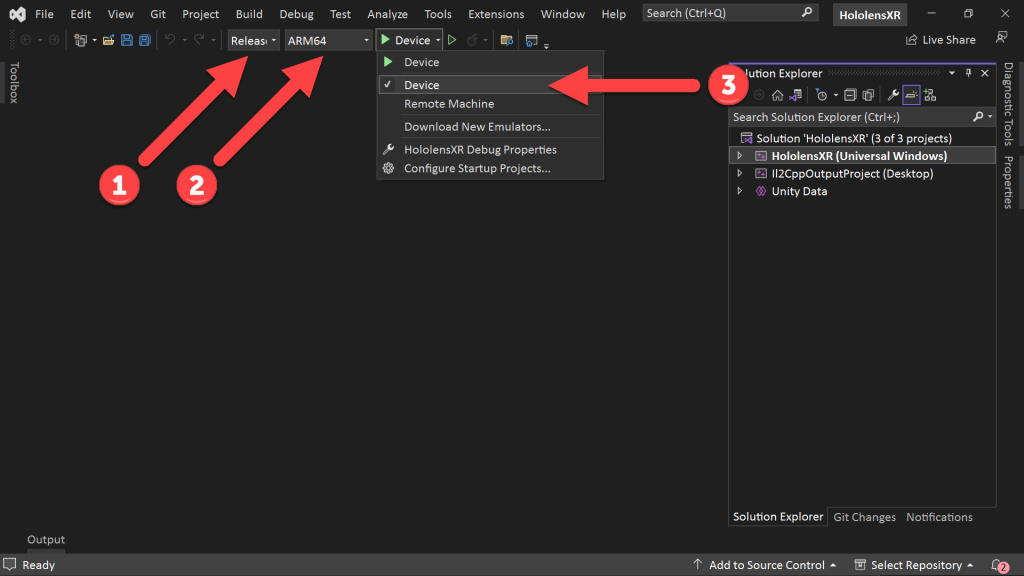
- (Visual Studio) Change to Release -> Change to ARM64 -> Change to Device
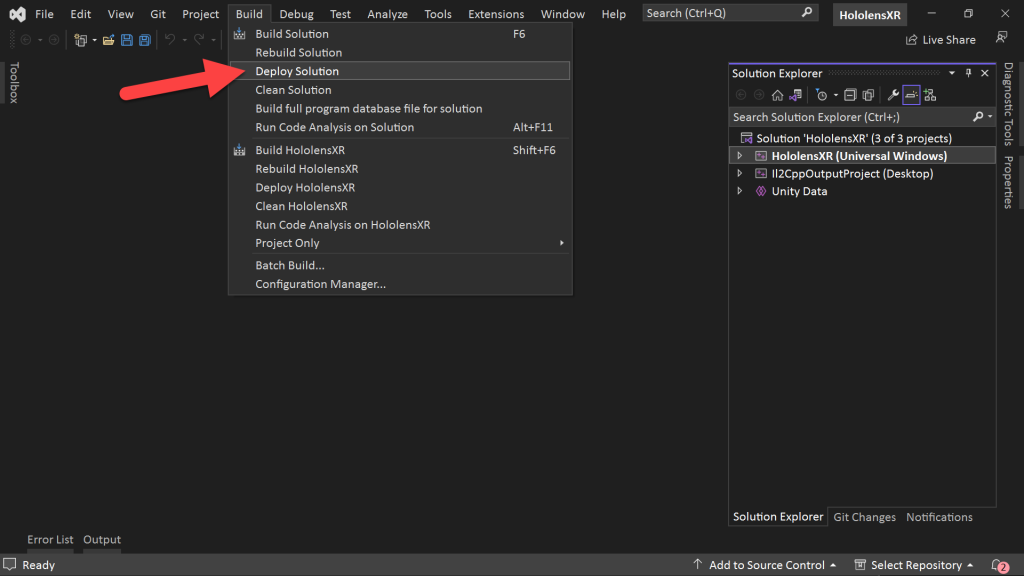
- (Visual Studio) Click Build -> Deploy Solution
Full Step-by-Step Instructions!
- (Unity Hub) Click Projects -> click New Project
- (Unity Hub) Click Editor Version -> Click the newest Unity version
- (Unity Hub) Click 3D template -> Set Project Name -> Choose Location -> Click Create Project
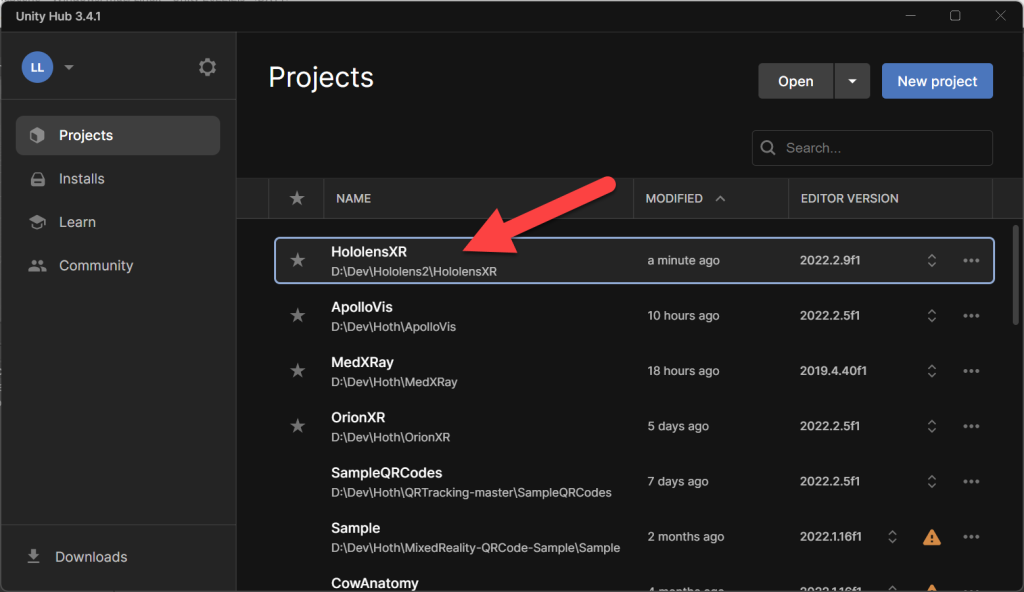
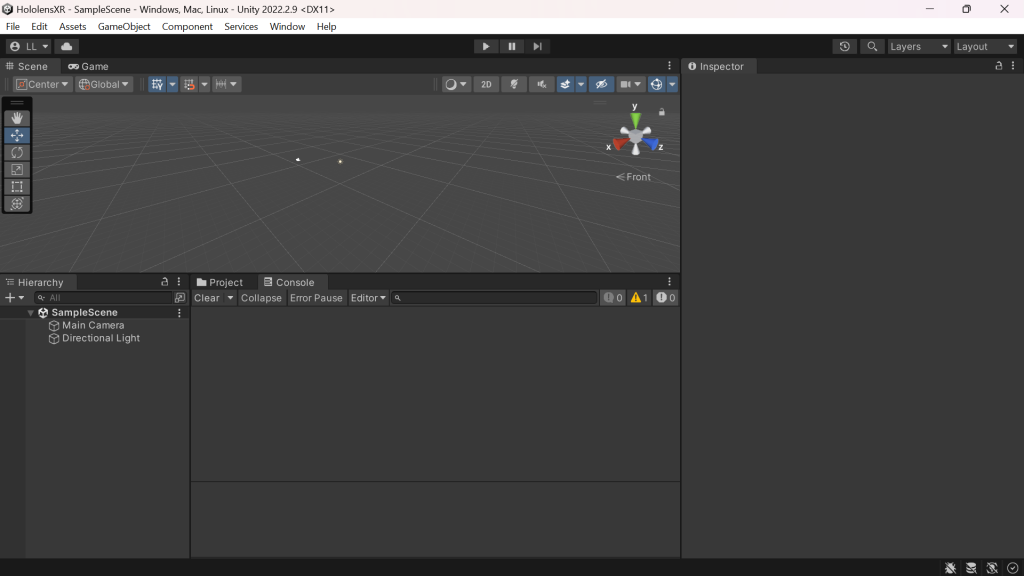
- (Unity Hub) Click on the new project!
- (Unity) Here’s where the XR Journey begins! This is what you should see when opening the new project.
- We need to change the project to build for a Hololens…
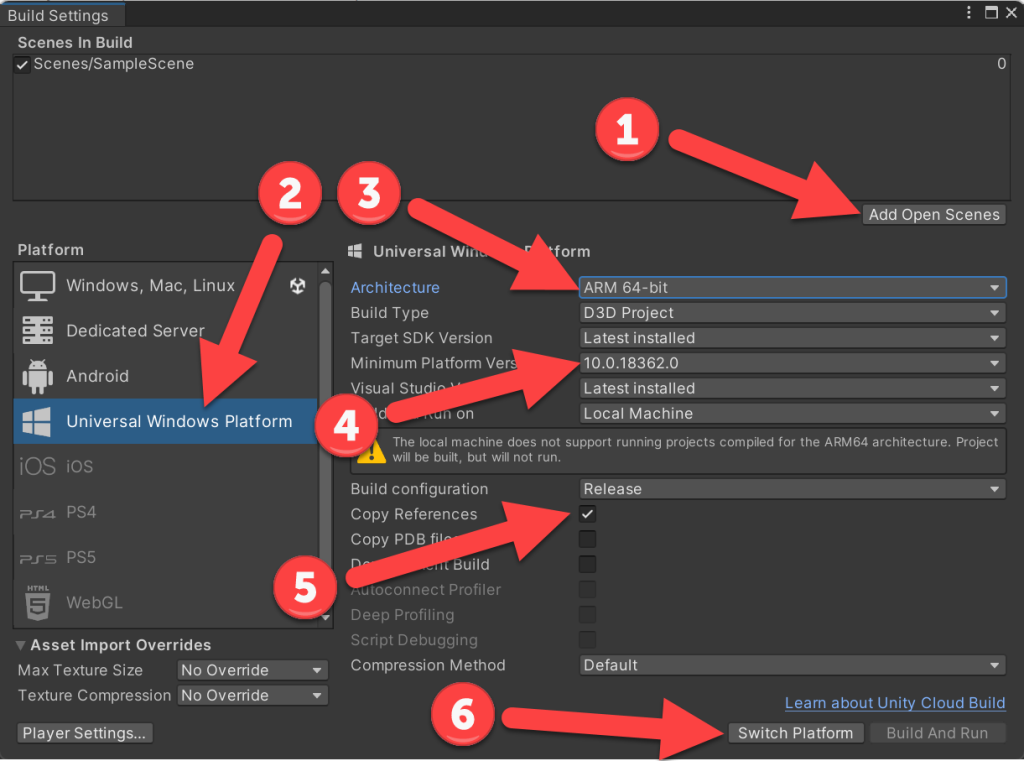
- (Unity Toolbar) File -> Build Settings…

- Click Add Open Scenes (this adds our current Unity scene to the Scenes in Build and checks it)
- Switch Platform to Universal Windows Platform
- Switch Architecture -> ARM 64-bit
- Switch Minimum Platform Version -> 10.0.18362.0 (or newer) — if you don’t see this version, then you need to update your Windows SDK see previous blog post
- Check Copy References (when we open up Visual Studio, this makes intellisense, etc. work!)
- Click Switch Platform
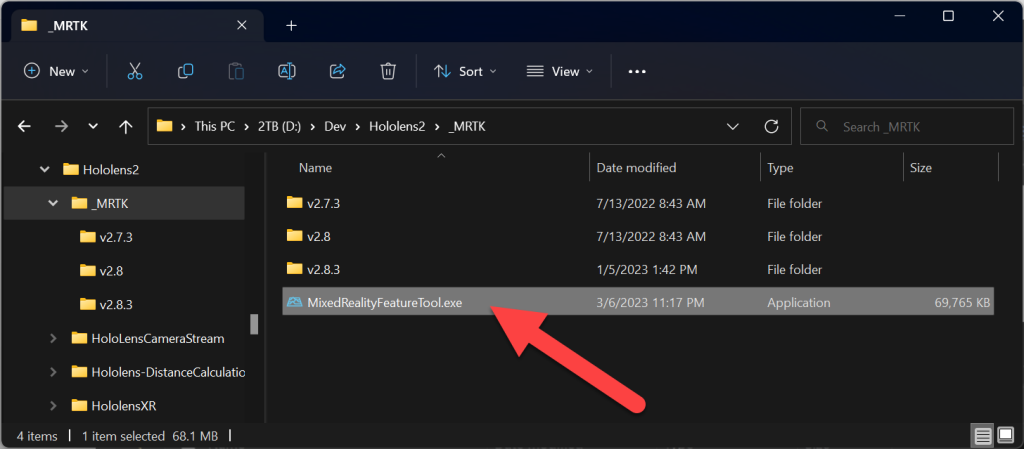
- Run MixedRealityFeatureTool.exe
- Open the folder where you saved your Mixed Reality Feature Tool to find the exe
- (Mixed Reality Feature Tool) Click Start
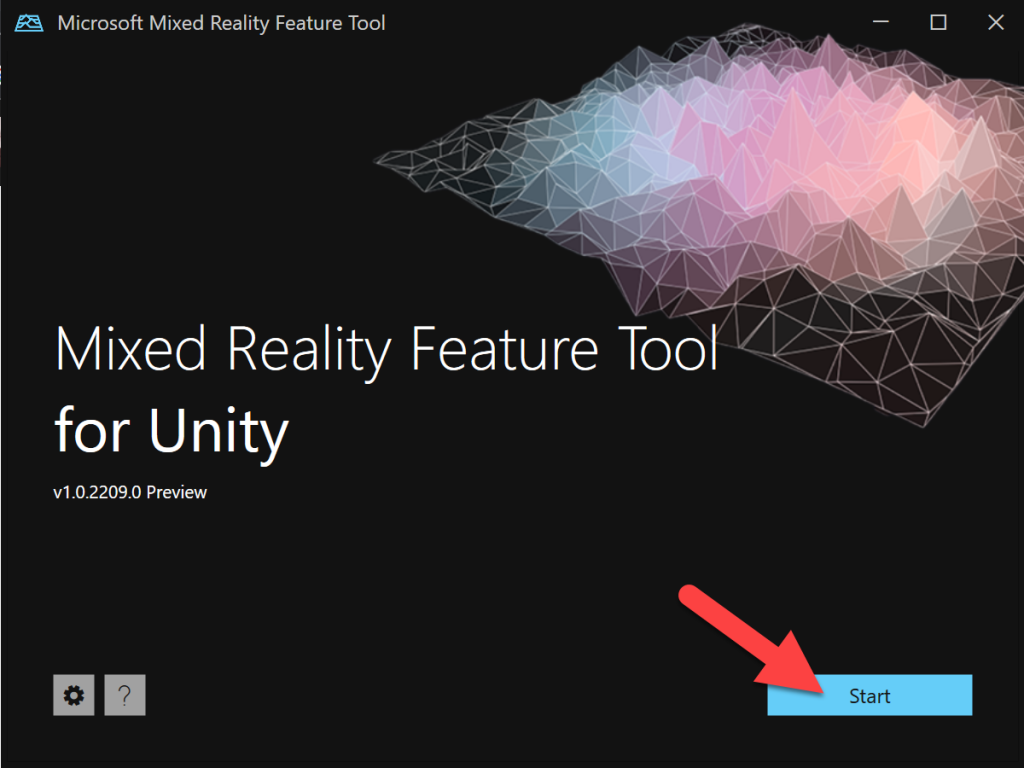
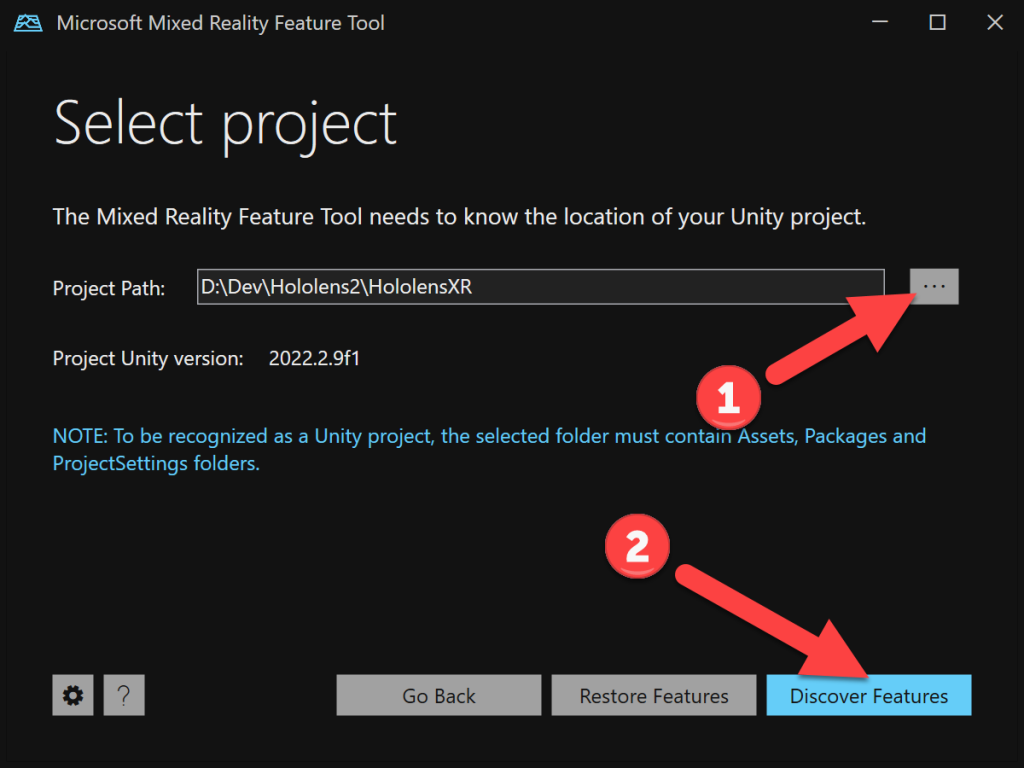
- Set the Project Path to your new Unity project
- Click Discover Features
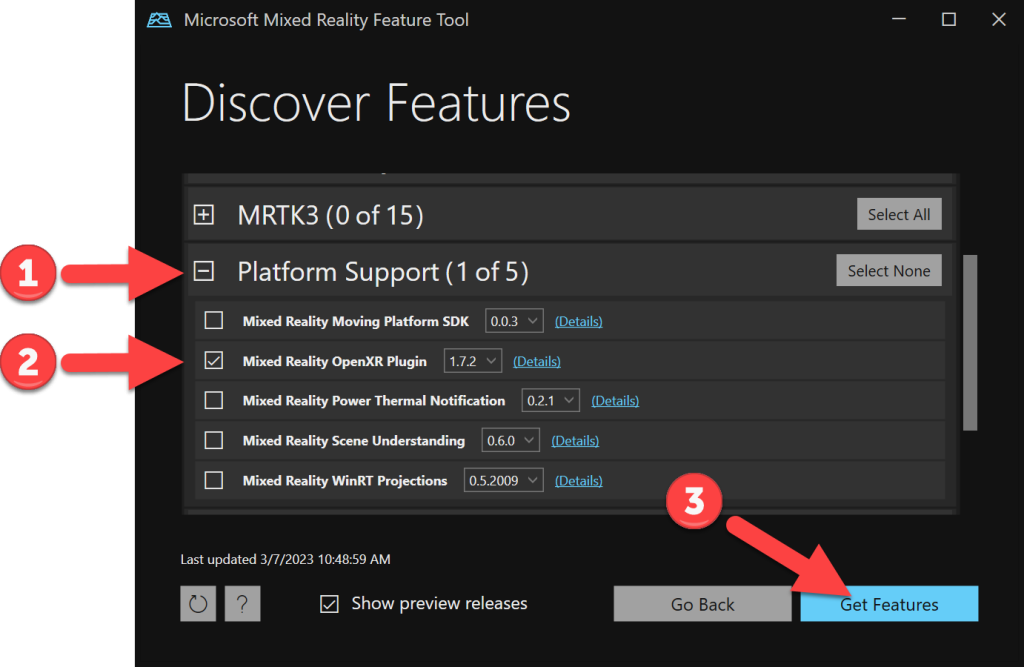
- Expand Platform Support
- Check Mixed Reality OpenXR Plugin
- Click Get Features
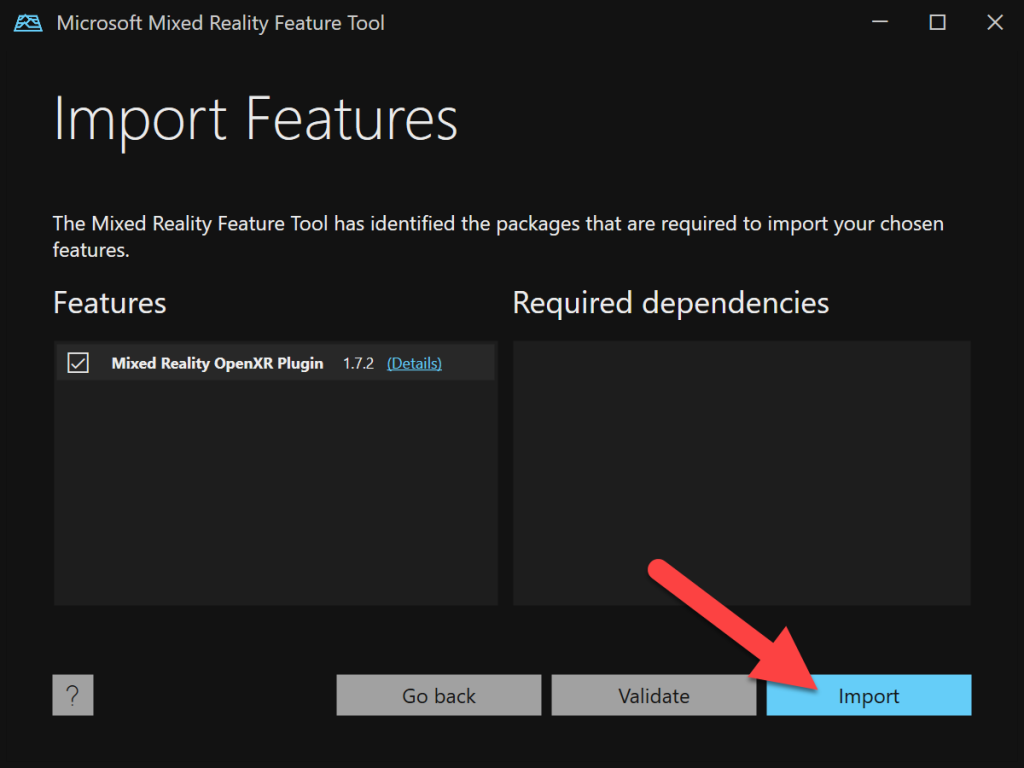
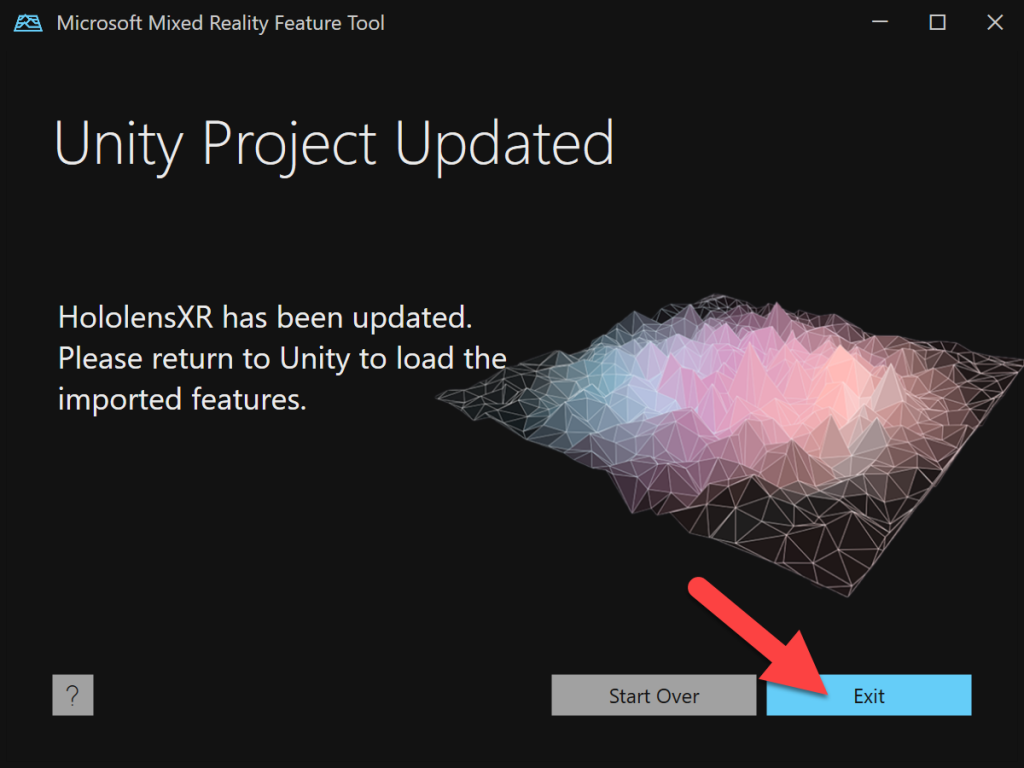
- Click Import
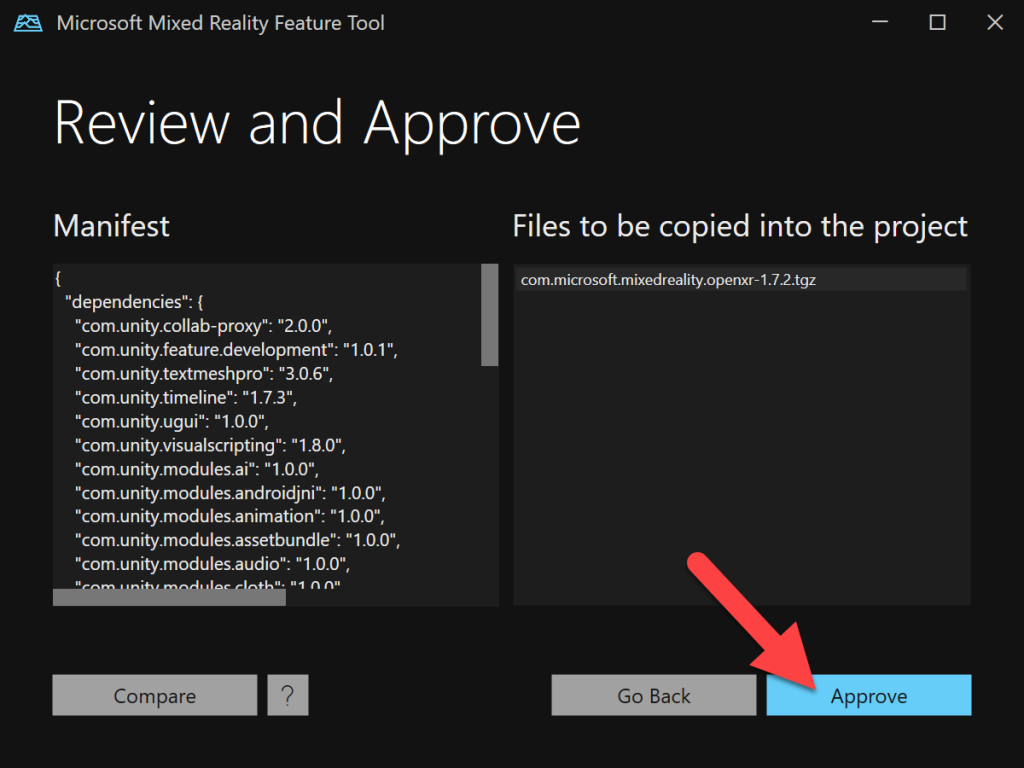
- Click Approve
- Click Exit
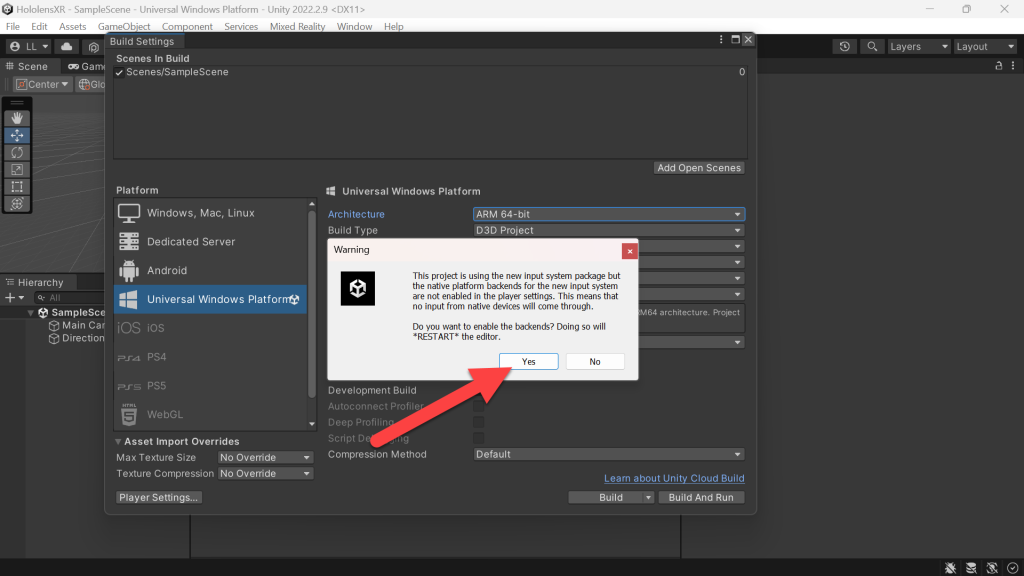
- (Unity) Open your Unity project – you will see that it’s importing the Mixed Reality OpenXR Plugin
- Click Yes to use the new input system, and Unity will restart
- (Unity Toolbar) Note that we now have a new Mixed Reality menu!
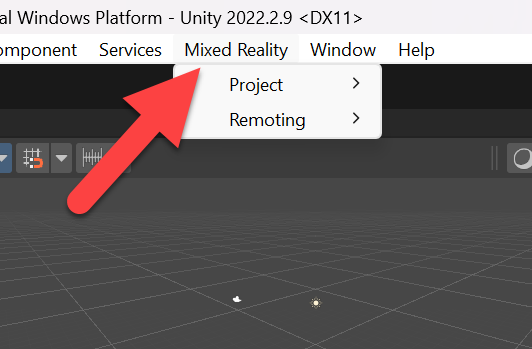
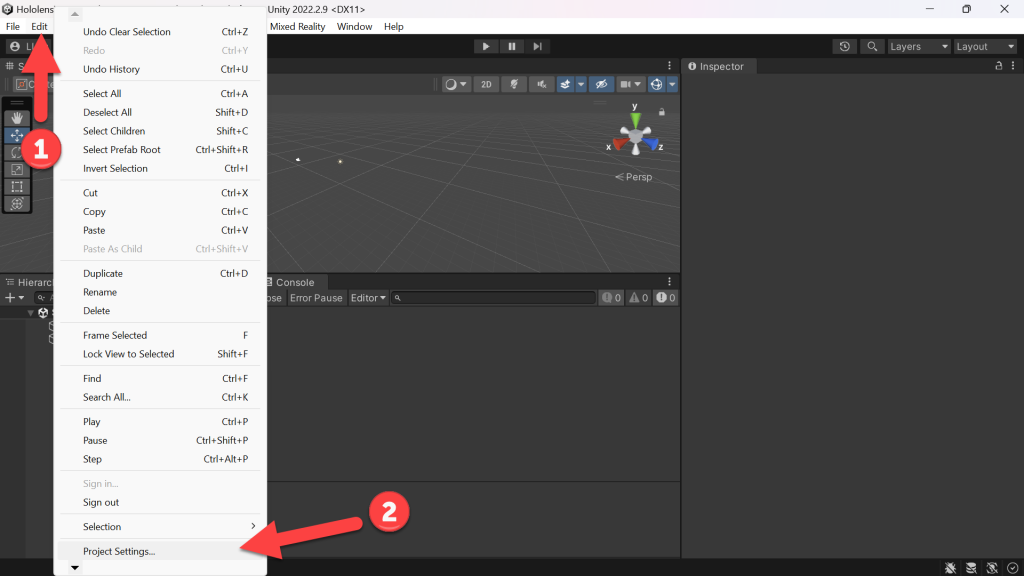
- (Unity Toolbar) Edit -> Project Settings
We need to configure our Universal Windows Platform XR Plug-in Management
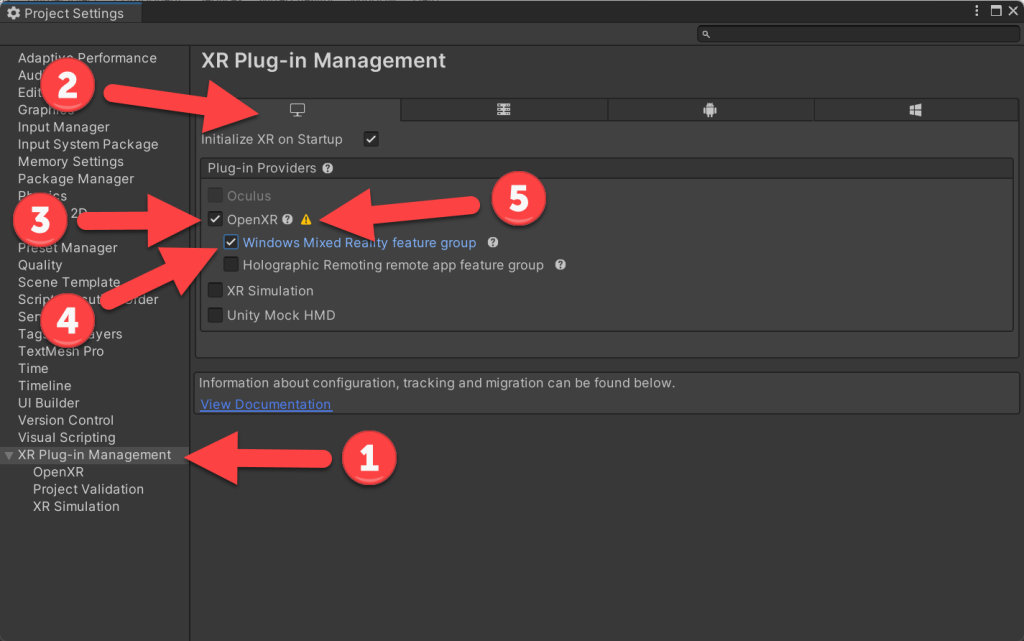
- (Project Settings) Click XR Plug-in Management
- Click Universal Windows Platform settings tab
- Check OpenXR
- Check Microsoft HoloLens feature group
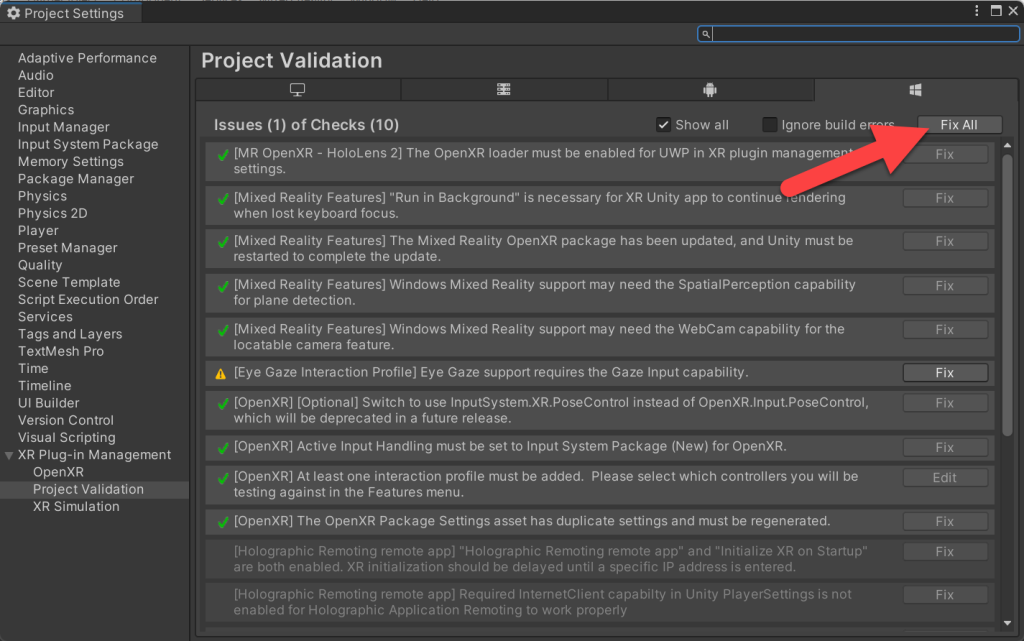
- Click the Warning Icon

- Click Fix All
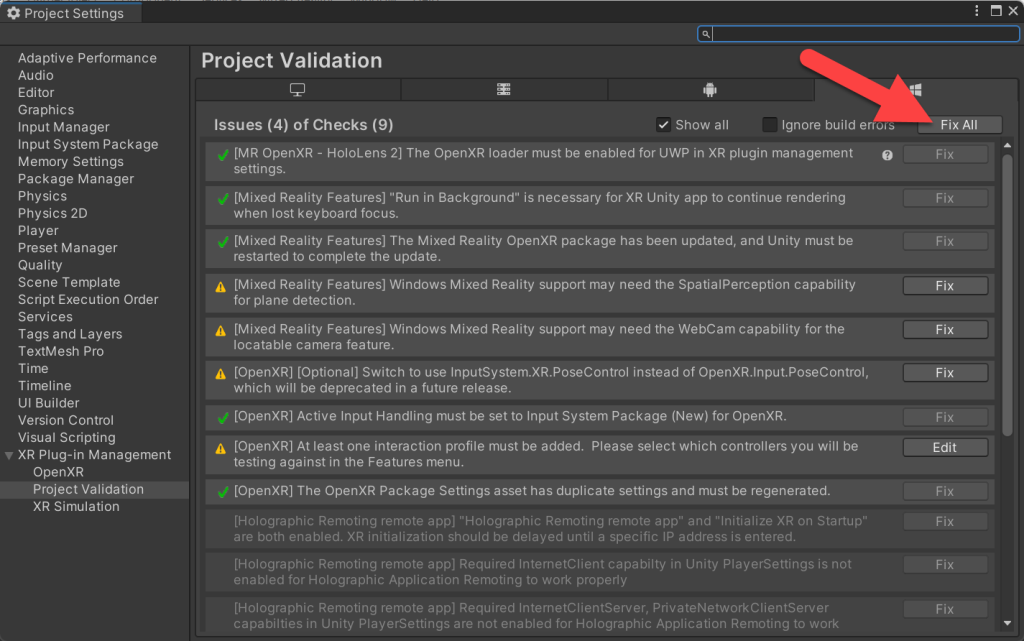
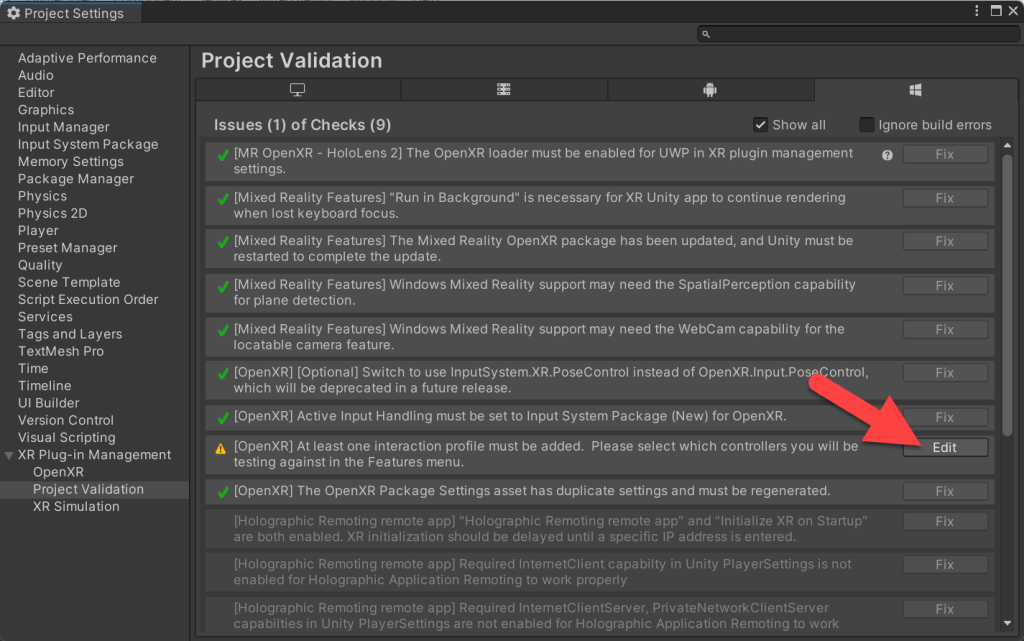
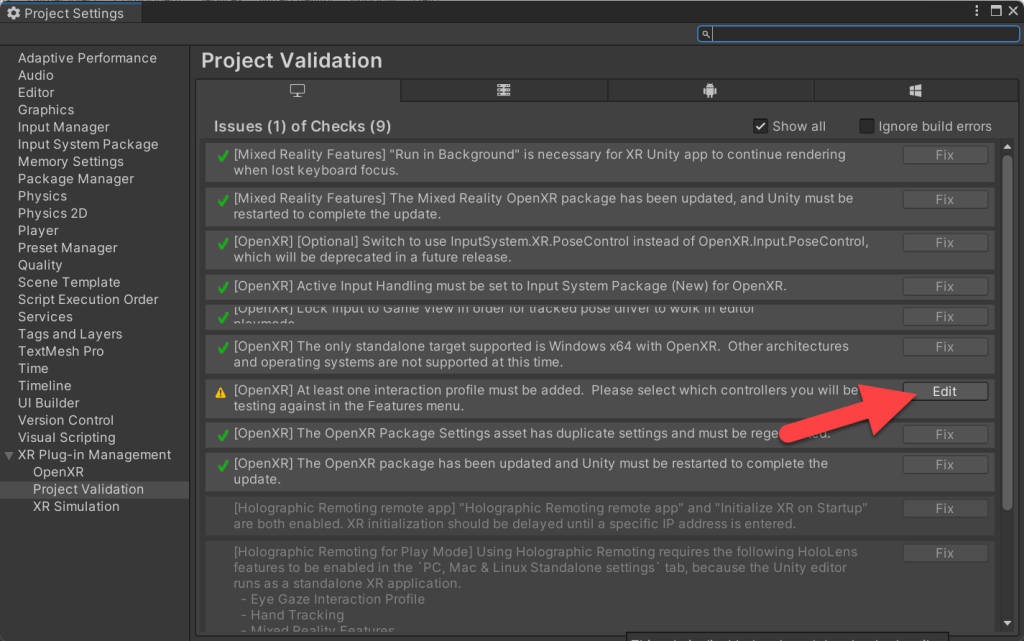
- Give Unity a little bit to make all fixes, and you’ll likely be left with “At least one interaction profile must be added…” -> Click Edit
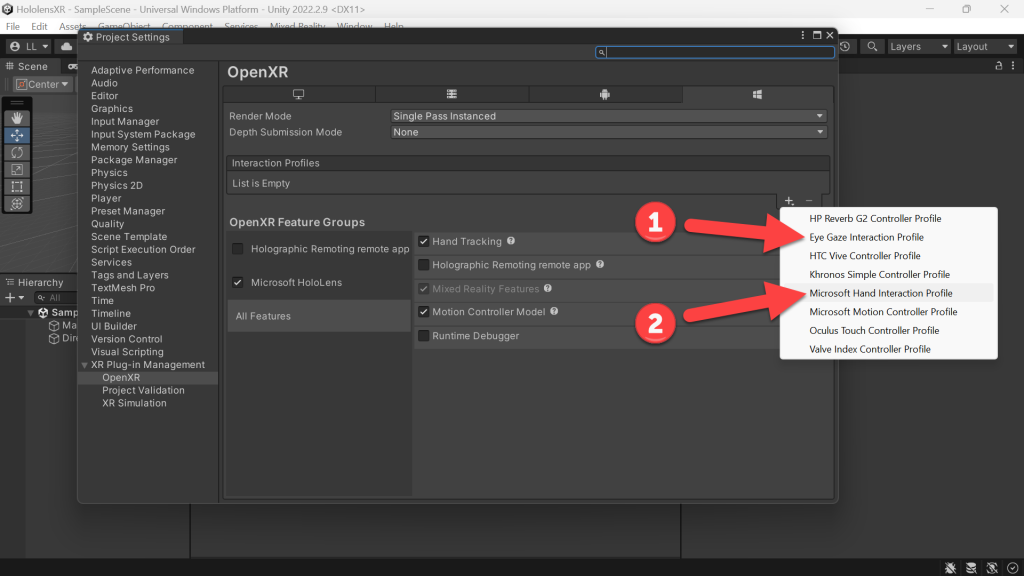
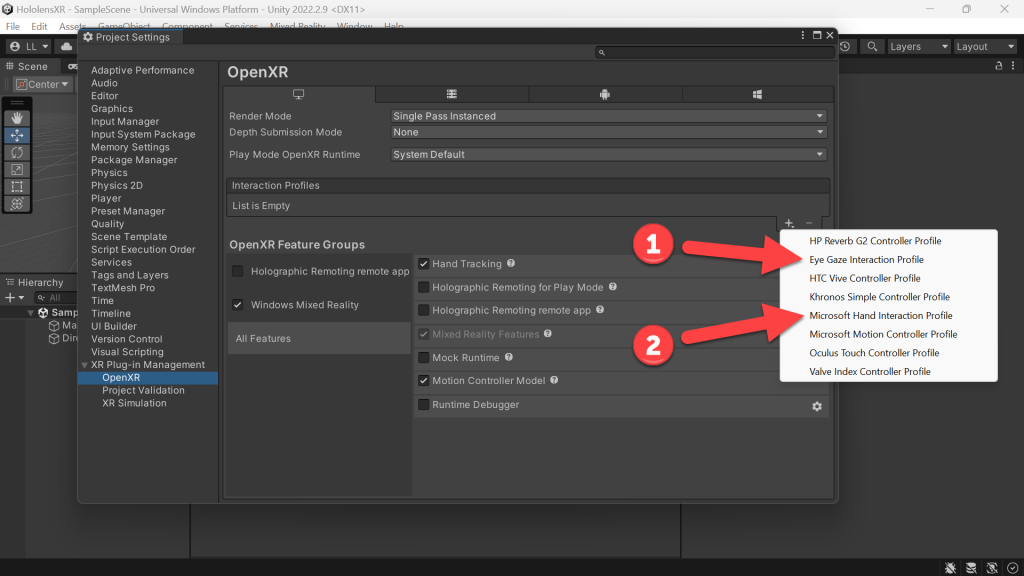
- (Project Settings -> OpenXR) Click the “+” under Interaction Profiles
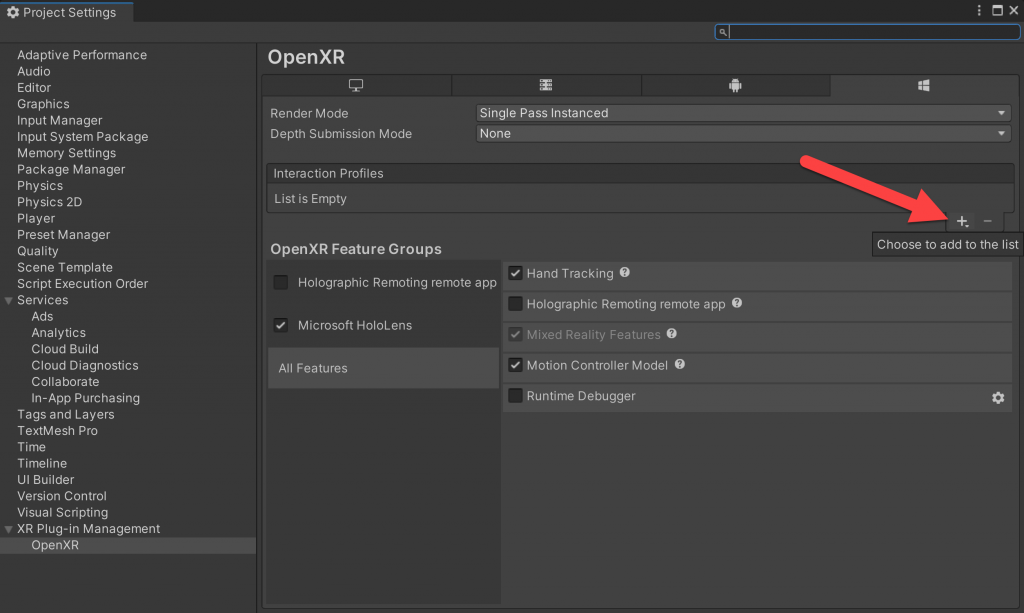
- Add Eye Gaze Interaction Profile
- Add Microsoft Hand Interaction Profile
- Next to Eye Gaze Interaction Profile-> Click the Warning Icon
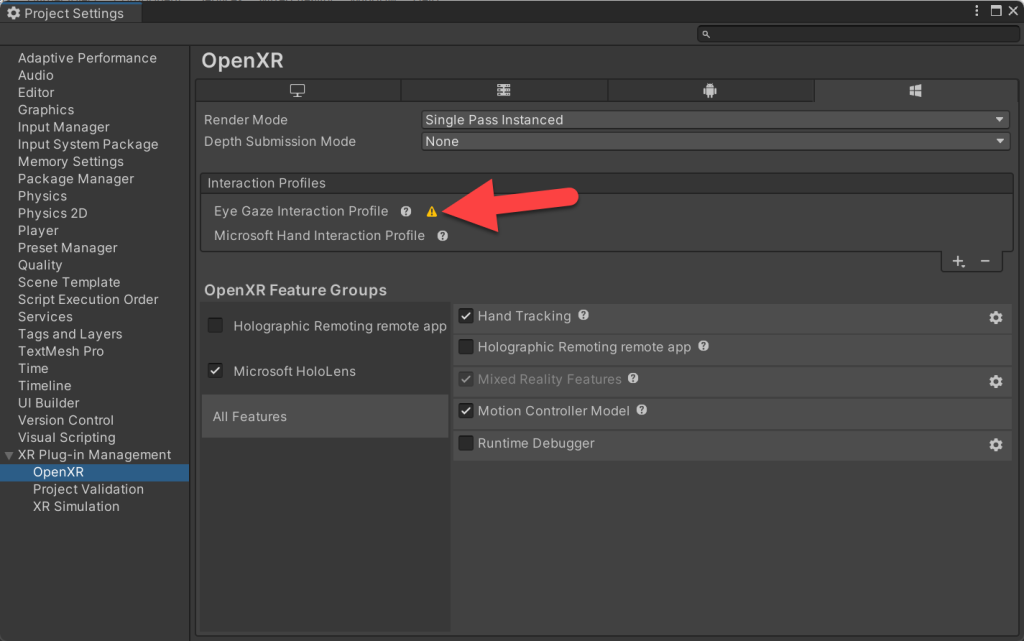
- Click Fix All
Now we need to do the same setup for the Windows, Mac, Linux XR Plug-in Management
- (Project Settings) Click XR Plug-in Management
- Click Windows, Mac, Linux settings tab
- Check OpenXR
- Check Microsoft HoloLens feature group
- Click the Warning Icon
- Click Edit
- Add Eye Gaze Interaction Profile
- Add Microsoft Hand Interaction Profile

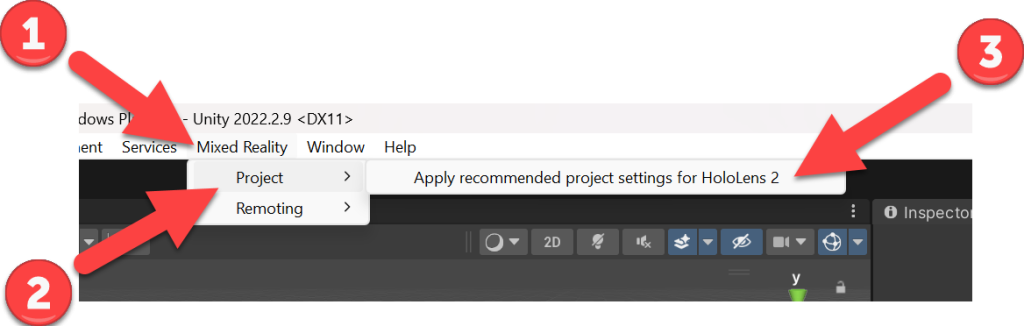
- (Unity Toolbar) Mixed Reality -> Project -> Apply recommended project settings for HoloLens 2
- Click Fix All
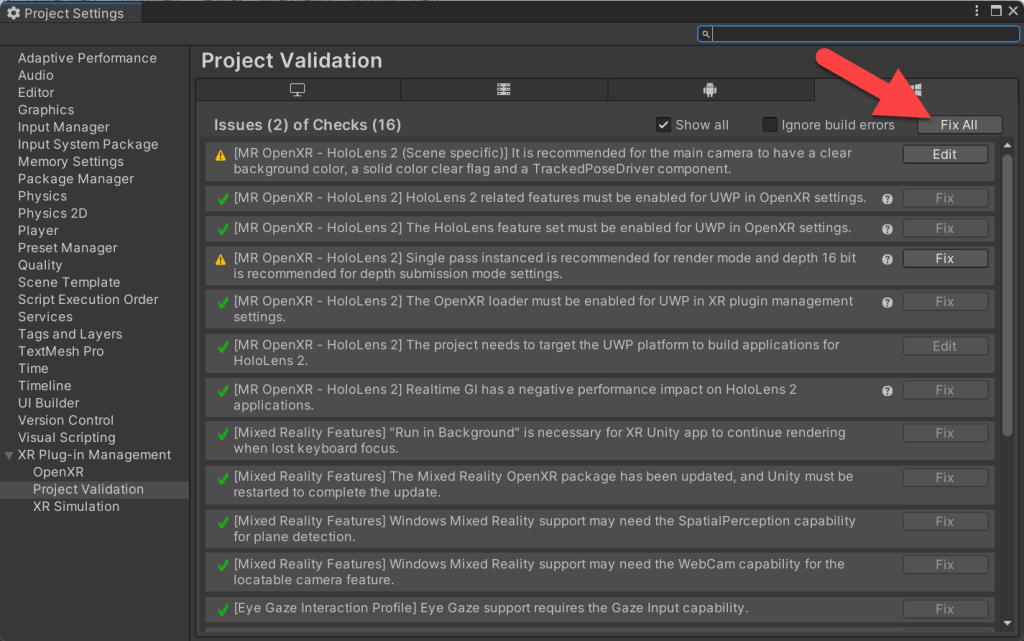
- Click Edit

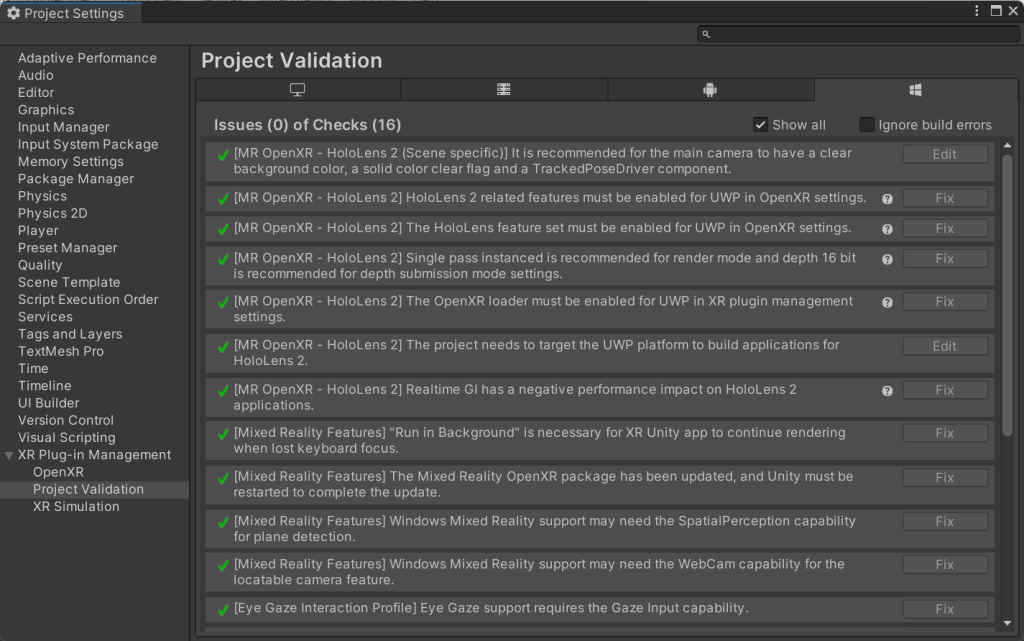
- Look for all issues to be marked as good!
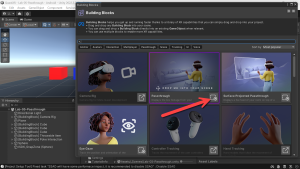
Now we need to add the MRTK files into our project – note, you -can- add MRTK to your project via the Mixed Reality Feature Tool however I’ve found that this doesn’t always add everything, i.e. such as all the MRTK Examples code – but dragging them in is easy and has always worked for me!
- (Unity) Click Project tab
- Click Assets folder
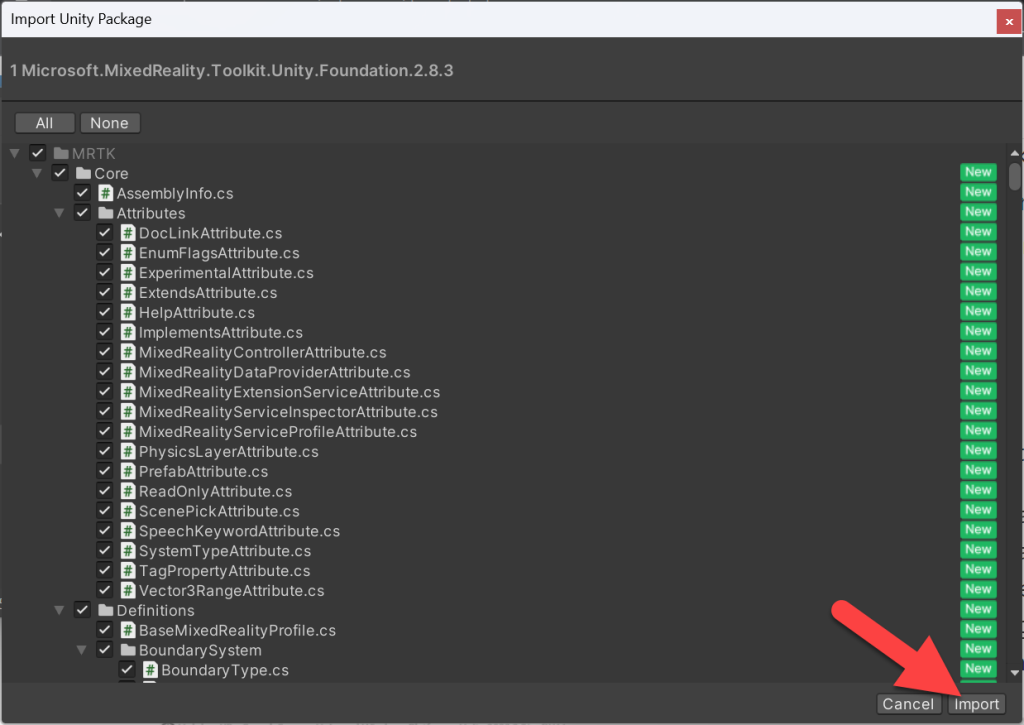
- Drag Microsoft.MixedReality.Toolkit.Unity.Foundation.2.8.3.unitypackage into the Assets section (as shown by arrow)
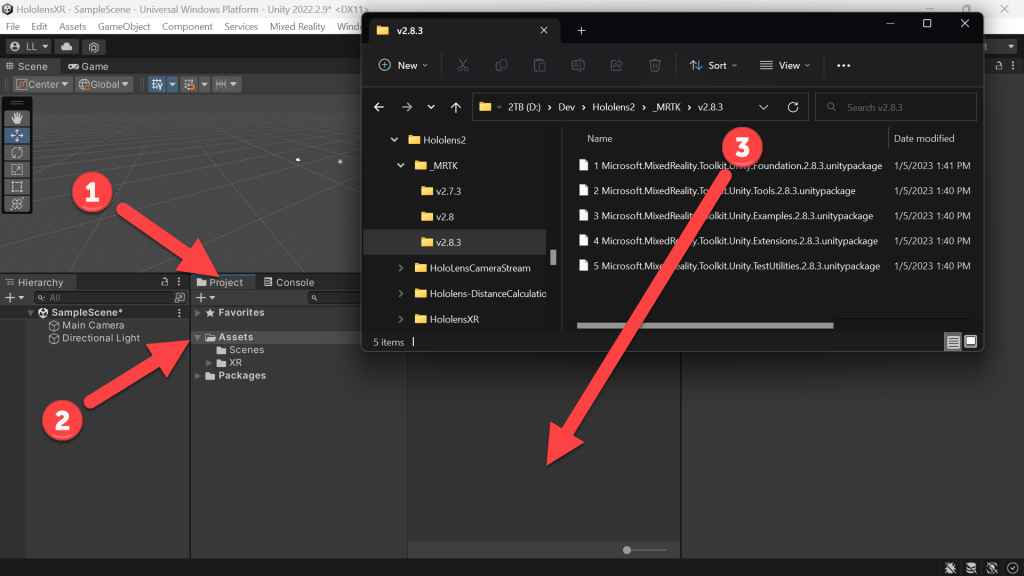
- (Import Unity Package) Click Import
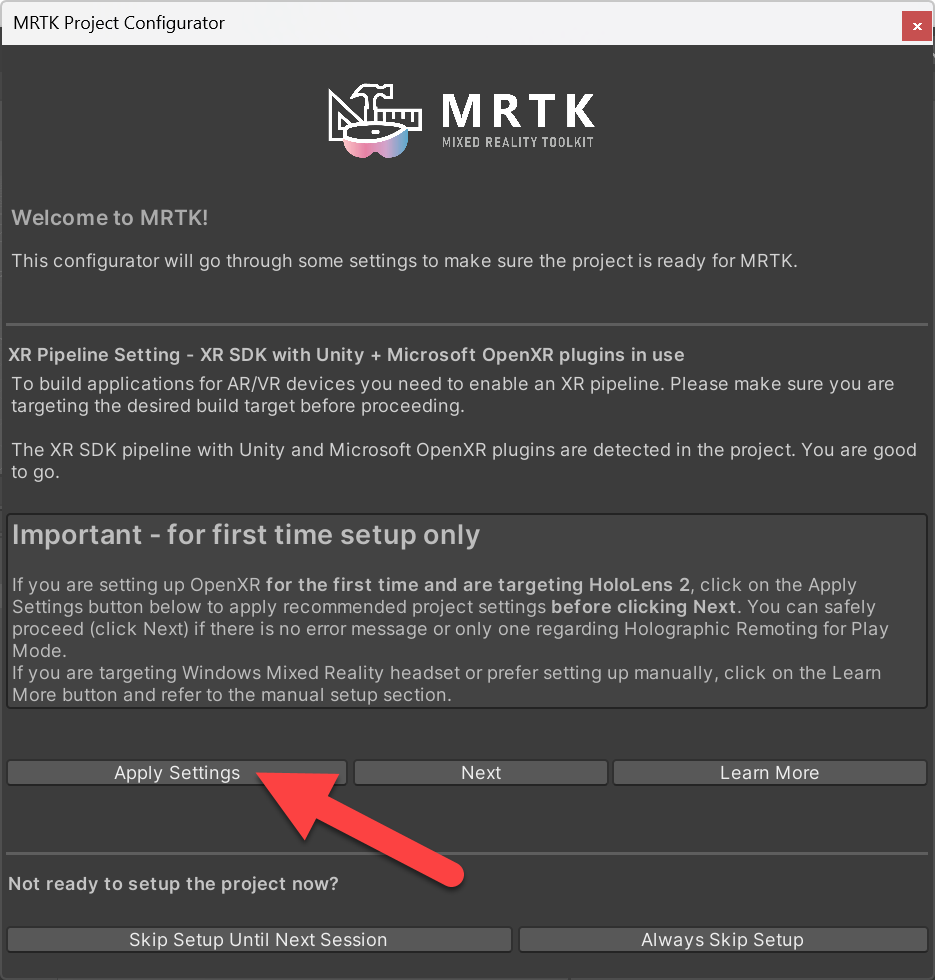
- Back to Unity, the MRTK Project Configurator should appear
- (MRTK Project Configurator) Click Apply Settings
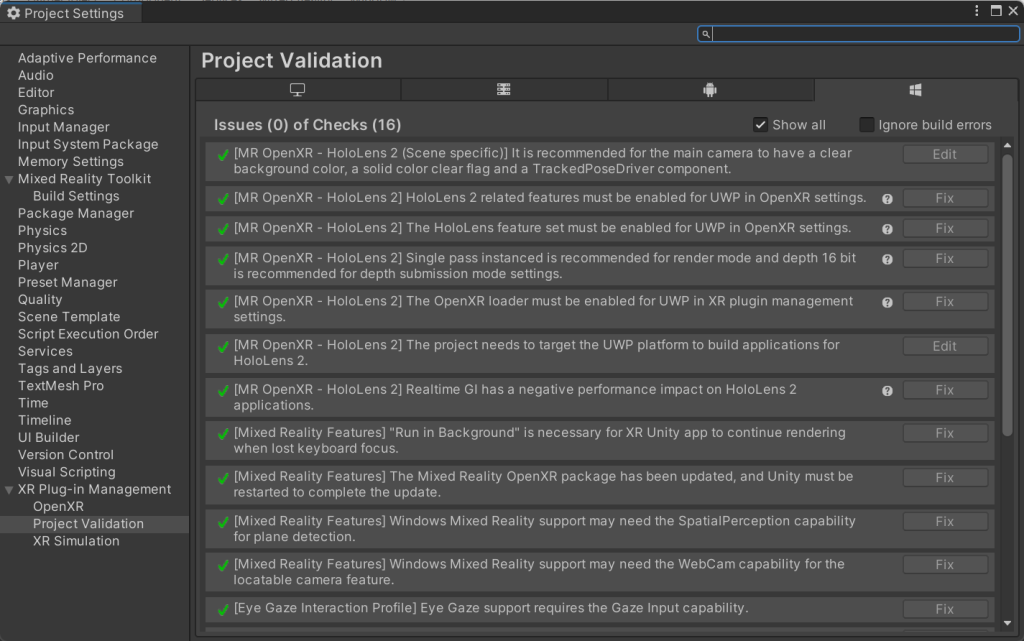
- (Project Settings) At this point everything -should- be good, but if anything needs to be fixed it will be highlighted
- (MRTK Project Configurator) Click Apply
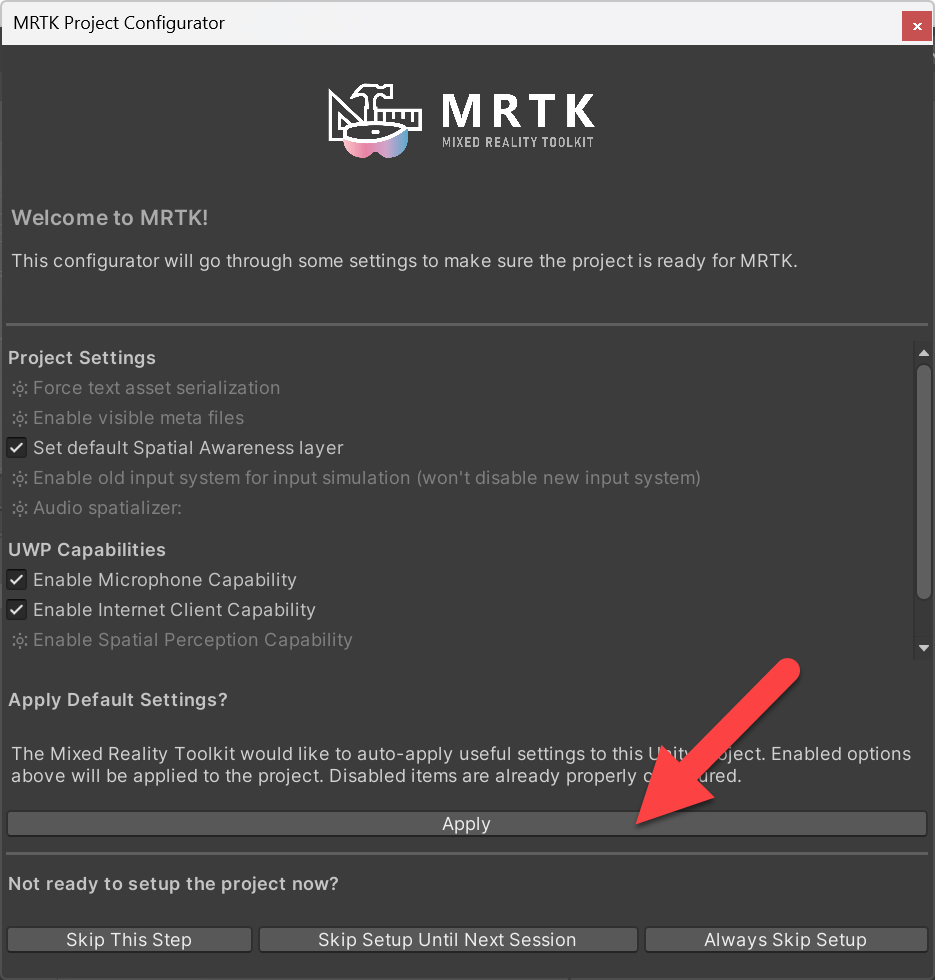
- Click Next

- Click Import TMP Essentials (TextMesh Pro is needed by MRTK and is generally highly useful!)
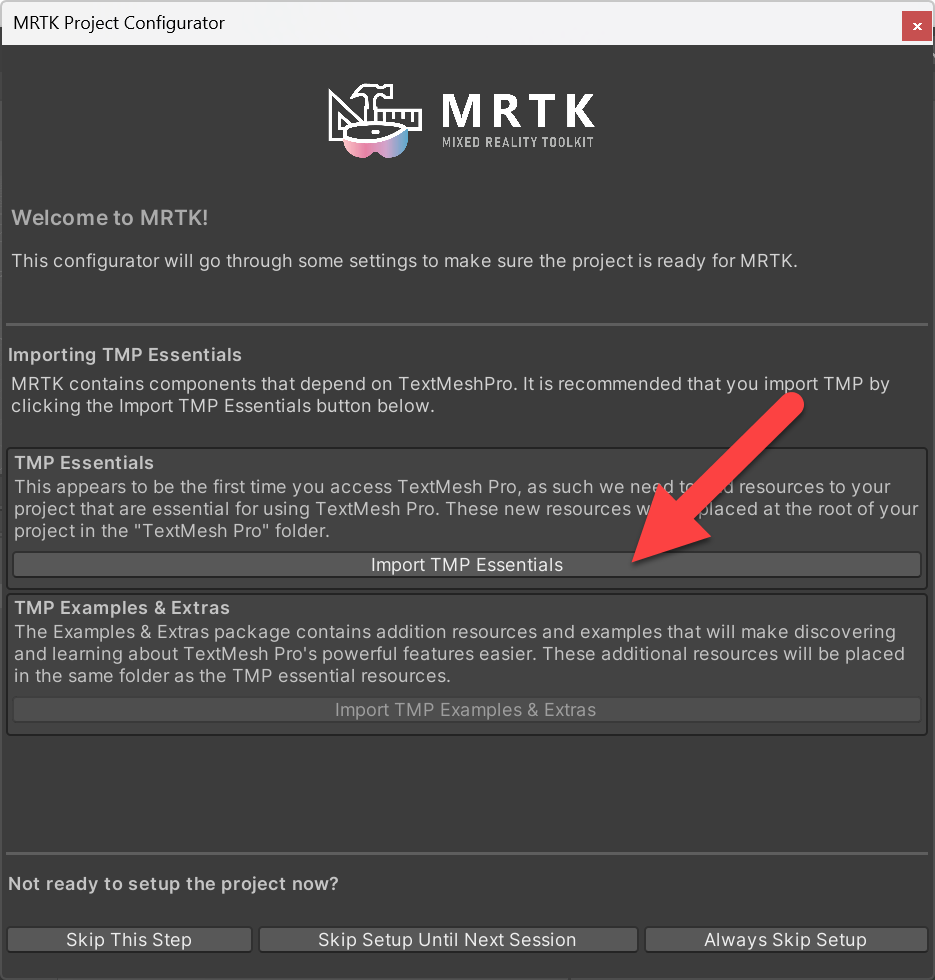
- Click Done

- Now add the other MRTK Unity Packages (one at a time) into the Assets section
- [Recommended] Microsoft.MixedReality.Toolkit.Unity.Tools.2.8.3.unitypackage
- [Recommended] Microsoft.MixedReality.Toolkit.Unity.Examples.2.8.3.unitypackage
- [Recommended] Microsoft.MixedReality.Toolkit.Unity.Extensions.2.8.3.unitypackage
- [Optional] Microsoft.MixedReality.Toolkit.Unity.TestUtilities.2.8.3.unitypackage
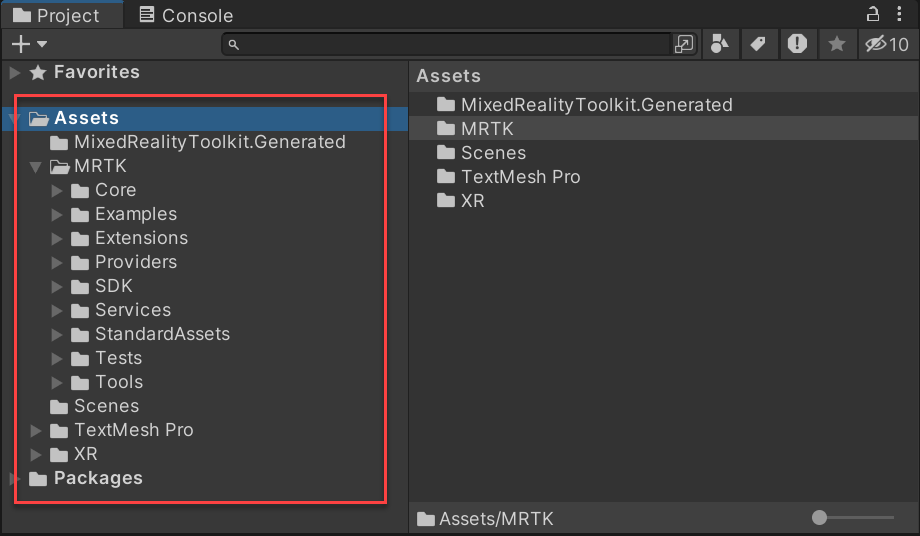
- When you’re all done, you’ll see the following folders in your Assets!
- [Bonus Content] You’ve officially configured your project! Whew…. Now let’s configure your scene!
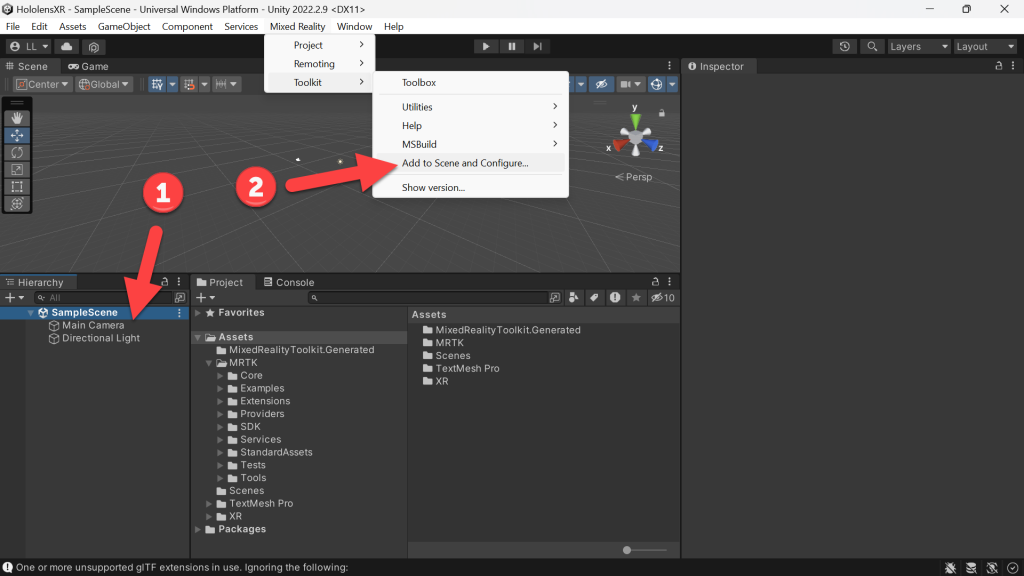
- (Unity Hierarchy) Select your scene
- (Toolbar) Mixed Reality -> Toolkit -> Add to Scene and Configure…
- You’ll now see the following in your scene!
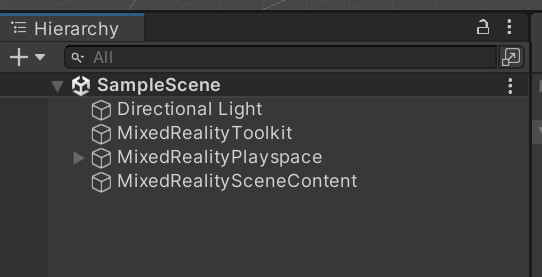
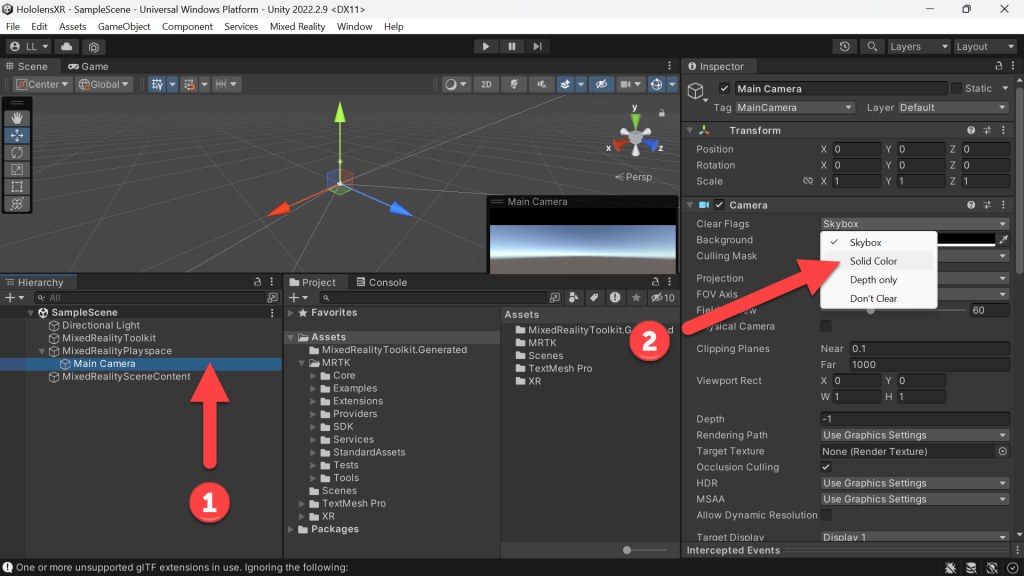
- (Hierarchy) Expand MixedRealityPlayspace -> Click Main Camera
- (Inspector) Camera -> Change Background to Solid Color (set to black if it doesn’t automatically do so)
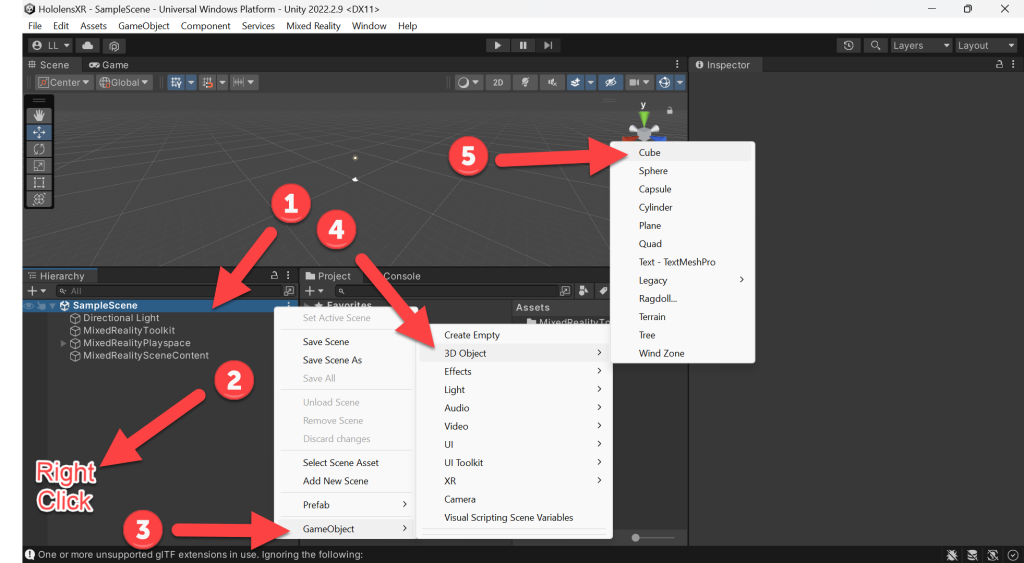
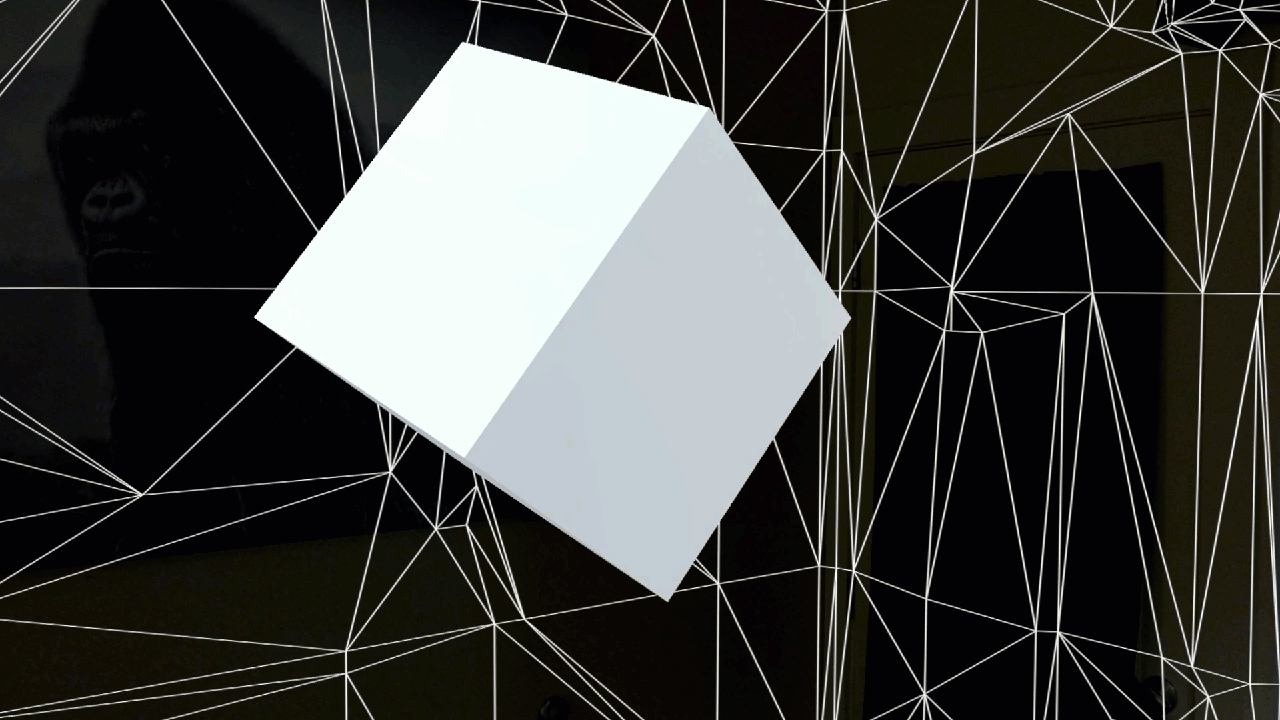
- Let’s add a 3D cube so we have something to look at…
- (Hierarchy) Click SampleScene
- RIGHT-Click below in the Hierarchy section
- Click GameObject in menu
- Click 3D Object
- Click Cube
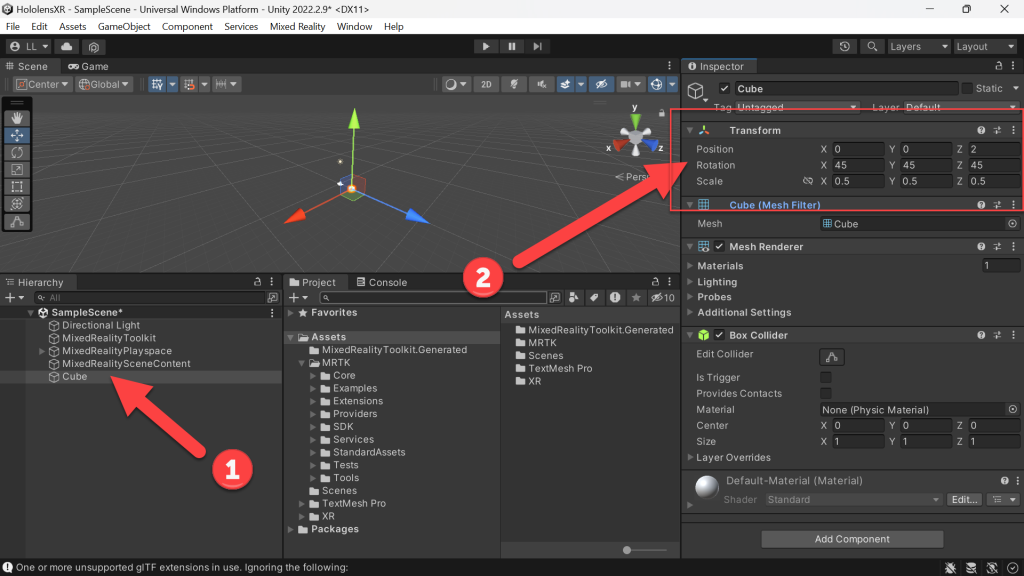
- (Hierarchy) Click Cube
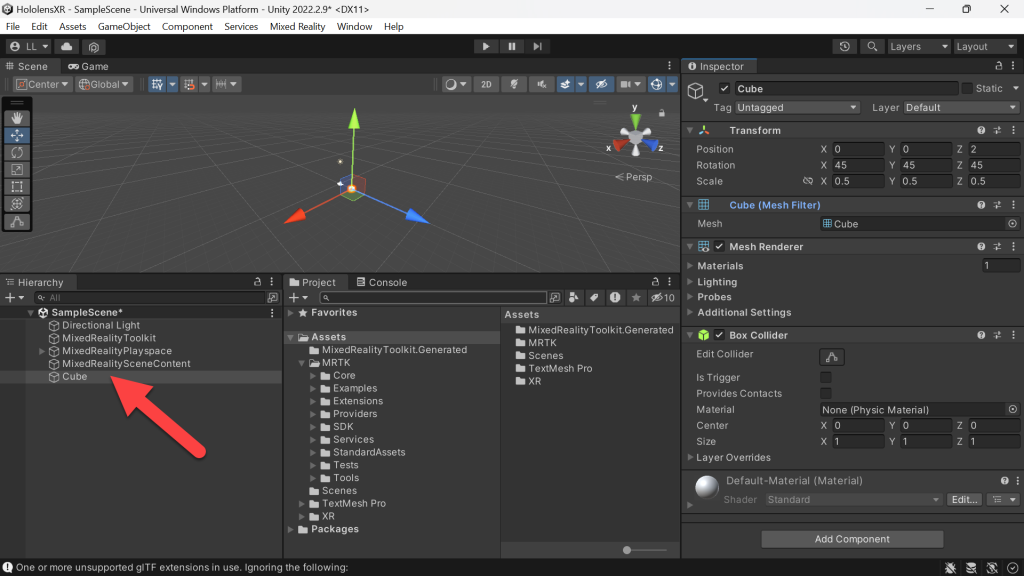
- (Hierarchy) Select Cube
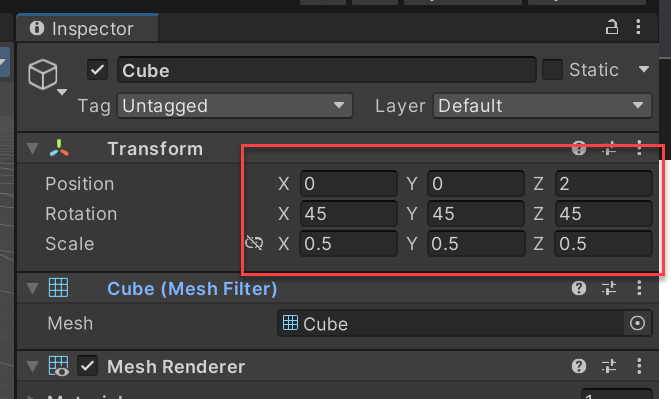
- (Inspector) Change the Cube’s Transform values (as seen in the next two images)
- (Toolbar) File -> Build Settings…
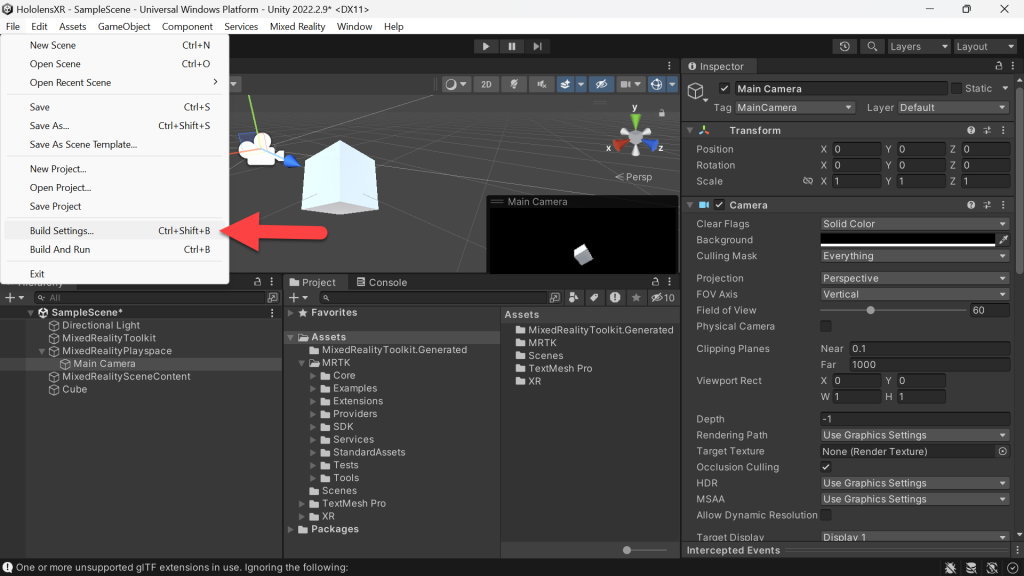
- Click Build (assuming all the values / selections look like the following)
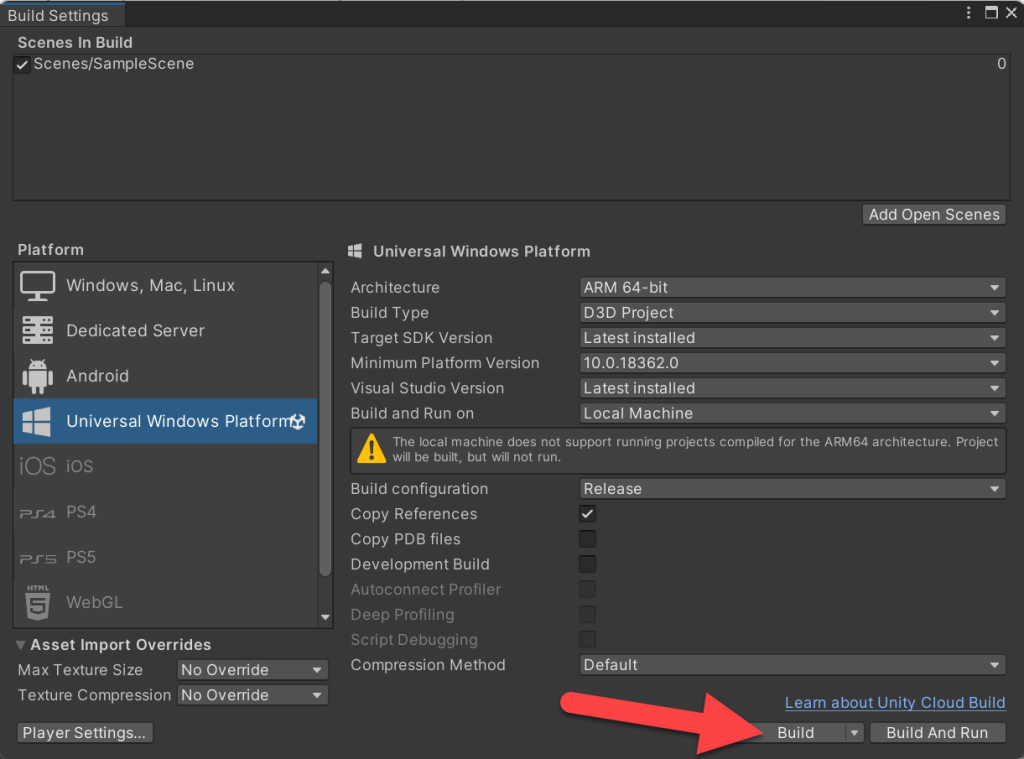
- Click New Folder -> I generally create a folder named Install -> Click Select Folder

- When building is complete, Unity should launch a Windows Explorer
- (Windows Explorer) Click on the *.sln file in your Install folder (assuming that’s what you named it)
- (Visual Studio) Change to Release
- Change to ARM64
- Change to Device
- (Visual Studio Toolbar) Click Build -> Deploy Solution
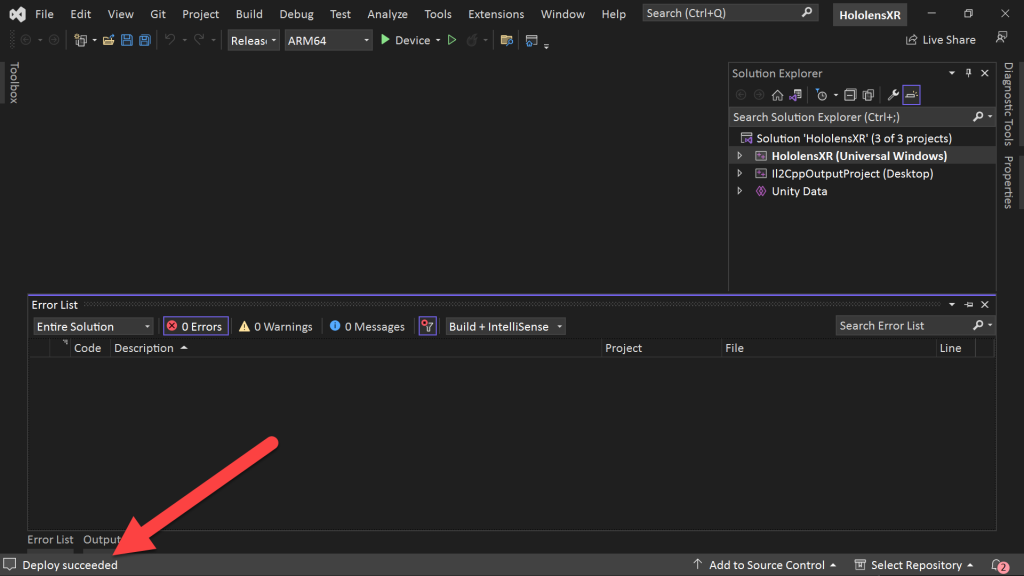
- If successful you should see the Deploy Succeeded message in the lower left corner
- Look at that! You now have a HoloCube in Mixed Reality – congratulations!
Love any feedback and see you in future XR blog posts.
Build something amazing in XR! — Lance
Want to see the other blog articles in this (and other) series?
Click here to see all of my XR Step-by-Step blogs separated by device and version!

share your git hub file my solution can be deployed but cannot see the cube.
Thank you, it’s the most detailed and understandable tutorial I have found